

Mods
-Self designed and build shift linkage. To use the factory steering colum shifter but turn the lever action around and shift a 4R70W (AODE) electronic automatic gearbox in a 1953 Ford F100.\r
\r
-A new radiator support because the previous owner reused the original support and did a terrible job at it.
\r
-A new radiator support because the previous owner reused the original support and did a terrible job at it.
Build story
Hi my name is Joris Luijten 26 years old and agricultural mechanic. Live in the Netherlands and I have a Ford F100 1953, equiped with a 4,6 V8 Modular Ford engine. Backed up with a 4r70W (AODE) automatic transmission. The engine is controlled by a EFIgnition standalone ecu and the transmission with a Quick1 TCM. \r
\r
Forum, the total project work on it:\r
http://www.usatrucks.nl/forum/viewtopic.php?f=25&t=18415\r
\r
Tuneable ECU with bluetooth function:\r
https://www.youtube.com/watch?v=o85lgZ5ojjk\r
\r
Designed and made my own tailgate hinge system without straps etc:\r
https://www.youtube.com/watch?v=FDYL3ojrRyk\r
\r
\r
\r
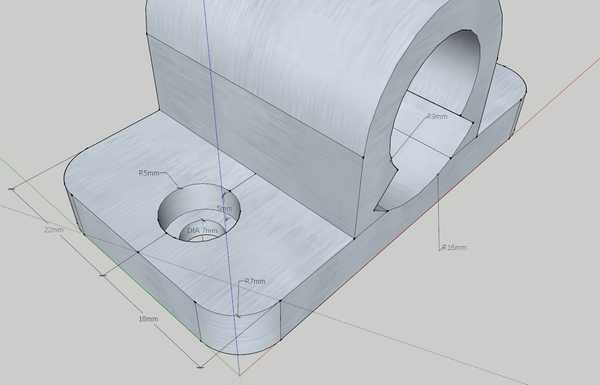
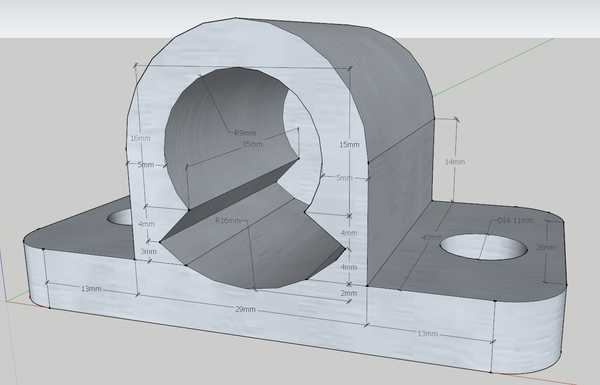
--Shifter--\r
I want to keep the original look inside the cabine so I tugged everything away but the shifter works just wrong way round to shift my transmission (it pushes instead of pulling). I figured out I needed a way to turn the movement around from a push to a pull lever to go the same way as my shifter lever on the transmission. \r
\r
I made a pipe with two chambers with delrin bushings inside that will be strong and thick enough to weld on and will not flex when yanking thru the gears. In the bushings a made a axle wich snugly fits. On one side I welded a lever with several mounting holes and on the other side I mounted a same style leaver exept this is mounted on the axle with a spring dowl so its detachable to service the bushings (wich never will be needed). I made a bracket for this contraption to bolt on the chassis.\r
\r
I found a bowden cable (cable wich u can use for pulling and pushing) of a Case tractor. The threads were very small like M5, so I adapted a M8 fork to fit the M5 threads. Made on side of the cable to the above made contraption and the other side to the transmission selector lever using a nicely fabbed up bracket wich was made folowing BOM standards using a cad template, stepper drill action, mig bonaza and some angle grinder art. \r
\r
With how every fits and works I have MORE that enough adjustability to work out the slop and its works like an absolute dream. Smooth and the way the levers work its the movement isn't snappy or stiff. Very pleased with how it works and its all out of sight so the original look is still there.\r
\r
Link to more pictures.\r
https://photos.app.goo.gl/QWjUPfCXxPcKGr6LA\r
\r
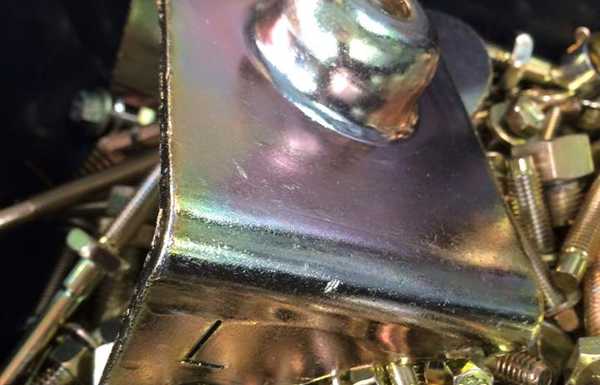
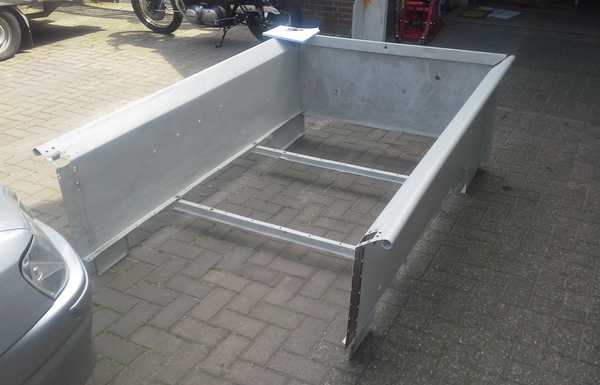
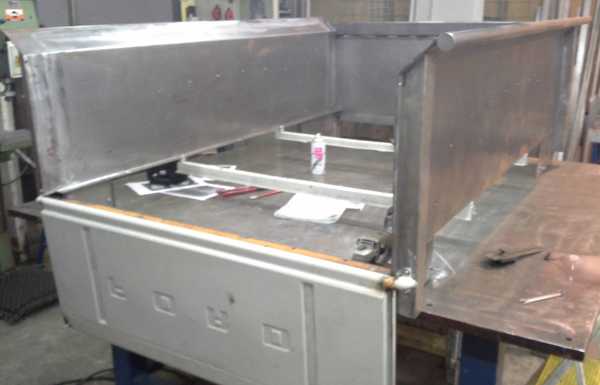
--Radiator support--\r
The original radiator support works fine for it's original uses, but when you put a diffrent more modern engine in it I rather use the radiator that comes original to that engine. The previous owner made the original support work but in a very poor way, I don't like to hang the radiator to its alu core when it has build in mounting spikkets (don't know the correct english word for them). \r
\r
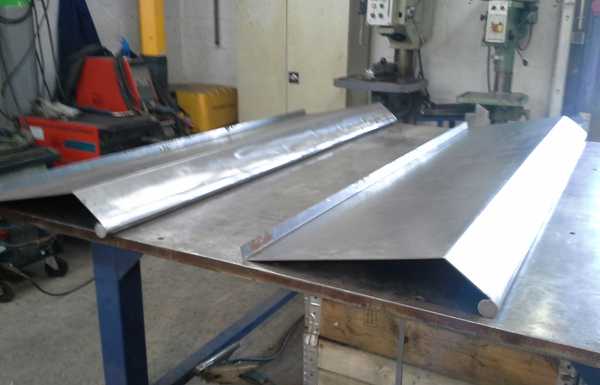
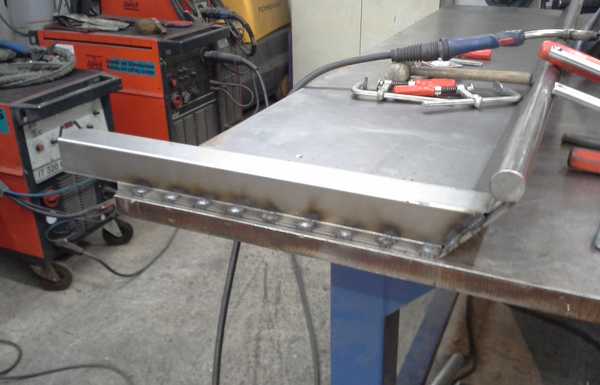
Made a paper plan and drew it in sketchup to see if I missed something (I did :P). Since the support also acts as a mounting bracket for the sheet metal for the nose its needs to be sturdy. 3mm Plate should do the trick and we made a piece of U section and made a big U shape from it where the radiator would fit in. \r
\r
After I made it I saw a design failure wich was pretty obvious, the frame bends up a little at the both sides so the square form wouldn't work. So I mangled it with the angle grinder (death wheel for the US people) and made the kink to folow the frame shape. Actually it make it look way nicer so I went on. \r
\r
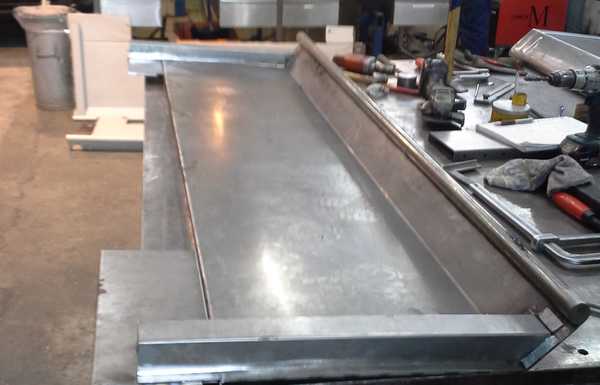
I made 2 plates in the U channel and made a hole with a slot in it to mound rubber dampers for the radiator spikkets to fit in and be damped in every way by the rubber.\r
At the top I made plates with vibrate dampers on it wich gently puch the radiator down into the rubber at the bottom. These plates also provide the mounting surface for the top section were the hood will drop onto. And offcourse for the BOM boyzz, all captive nuts.\r
\r
Because there will be some weight hanging from the sides of the U shape support, I made a stainless X brace to make the two sides TY together and also make it look nice. Gave it a lik of paint and did I nice touch on the radiator. Very pleased with the outcome and how it looks.\r
\r
Check the pictures below.\r
\r
Link to more pictures:\r
https://photos.google.com/album/AF1QipMFma-hDLftFHbWTeFaGjYiv6VNOquXoetC2-2g
\r
Forum, the total project work on it:\r
http://www.usatrucks.nl/forum/viewtopic.php?f=25&t=18415\r
\r
Tuneable ECU with bluetooth function:\r
https://www.youtube.com/watch?v=o85lgZ5ojjk\r
\r
Designed and made my own tailgate hinge system without straps etc:\r
https://www.youtube.com/watch?v=FDYL3ojrRyk\r
\r
\r
\r
--Shifter--\r
I want to keep the original look inside the cabine so I tugged everything away but the shifter works just wrong way round to shift my transmission (it pushes instead of pulling). I figured out I needed a way to turn the movement around from a push to a pull lever to go the same way as my shifter lever on the transmission. \r
\r
I made a pipe with two chambers with delrin bushings inside that will be strong and thick enough to weld on and will not flex when yanking thru the gears. In the bushings a made a axle wich snugly fits. On one side I welded a lever with several mounting holes and on the other side I mounted a same style leaver exept this is mounted on the axle with a spring dowl so its detachable to service the bushings (wich never will be needed). I made a bracket for this contraption to bolt on the chassis.\r
\r
I found a bowden cable (cable wich u can use for pulling and pushing) of a Case tractor. The threads were very small like M5, so I adapted a M8 fork to fit the M5 threads. Made on side of the cable to the above made contraption and the other side to the transmission selector lever using a nicely fabbed up bracket wich was made folowing BOM standards using a cad template, stepper drill action, mig bonaza and some angle grinder art. \r
\r
With how every fits and works I have MORE that enough adjustability to work out the slop and its works like an absolute dream. Smooth and the way the levers work its the movement isn't snappy or stiff. Very pleased with how it works and its all out of sight so the original look is still there.\r
\r
Link to more pictures.\r
https://photos.app.goo.gl/QWjUPfCXxPcKGr6LA\r
\r
--Radiator support--\r
The original radiator support works fine for it's original uses, but when you put a diffrent more modern engine in it I rather use the radiator that comes original to that engine. The previous owner made the original support work but in a very poor way, I don't like to hang the radiator to its alu core when it has build in mounting spikkets (don't know the correct english word for them). \r
\r
Made a paper plan and drew it in sketchup to see if I missed something (I did :P). Since the support also acts as a mounting bracket for the sheet metal for the nose its needs to be sturdy. 3mm Plate should do the trick and we made a piece of U section and made a big U shape from it where the radiator would fit in. \r
\r
After I made it I saw a design failure wich was pretty obvious, the frame bends up a little at the both sides so the square form wouldn't work. So I mangled it with the angle grinder (death wheel for the US people) and made the kink to folow the frame shape. Actually it make it look way nicer so I went on. \r
\r
I made 2 plates in the U channel and made a hole with a slot in it to mound rubber dampers for the radiator spikkets to fit in and be damped in every way by the rubber.\r
At the top I made plates with vibrate dampers on it wich gently puch the radiator down into the rubber at the bottom. These plates also provide the mounting surface for the top section were the hood will drop onto. And offcourse for the BOM boyzz, all captive nuts.\r
\r
Because there will be some weight hanging from the sides of the U shape support, I made a stainless X brace to make the two sides TY together and also make it look nice. Gave it a lik of paint and did I nice touch on the radiator. Very pleased with the outcome and how it looks.\r
\r
Check the pictures below.\r
\r
Link to more pictures:\r
https://photos.google.com/album/AF1QipMFma-hDLftFHbWTeFaGjYiv6VNOquXoetC2-2g